Wisconsin Fast Plants presents this guest blog as a contribution from a member of our sister program, Bottle Biology. Bottle Biology projects encourage creative ways to grow plants, such as the bottle growing system, to promote science as a tool everyone can use to explore the world. This guest blog is provided by Bottle Biologist Joel Cryer. Thanks Joel!
Construction of a Universal Reservoir Bottle Growing System
Background
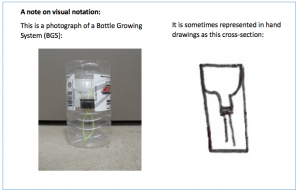
This device is a variation on the Bottle Growing System (BGS), which is an inexpensive self-watering planter made from a recycled bottle. If you have not worked with the BGS before, the instructions for the standard design are useful as background information. The standard BGS instructions can be found by Googling the phrase “Bottle Growing System how to.”
The BGS is well suited to classroom plant growth and experimentation in many ways – it is easy to make at low cost and is very modular. However, when one is working with large groups of BGS units, the separate water reservoirs can pose a maintenance problem. It is difficult to keep tabs on a dozen or more reservoir levels, particularly when the BGS units are kept under artificial lighting, which limits access to the bottles at the back of the light cabinet.
This universal reservoir bottle growing system, or UBGS, resolves that problem but keeps the system modular by watering many bottles from one common reservoir.
Important: Isolated reservoirs are a control in certain experiments. For instance, if the soil in two plantings is to be treated with differing levels of a water-soluble chemical, the UBGS would be a mistake, as it could result in transfer of the chemical between the two plantings.
That being said, many applications do not require separate reservoirs. For these applications the UBGS makes maintenance simpler. For example, the UBGS is appropriate for the production of plant cuttings for use in Bottle Biology projects like the Bottle Dome Gardens and the Discovery Cup Gardens. These projects can be found by Googling the phrases “Bottle dome garden Paul’s Sandbox” and “Discovery cup garden Paul’s Sandbox.”
Materials and Tools
-Bottles: It is advised to start with single-serving bottles (0.5 L, about 20 oz) as these are often easier to source, and a UBGS built of larger bottles would be large for a classroom setting. Whatever size bottles you start with, ensure that the bottles are all as close to identical as possible. Also be sure you have a cap for each bottle.
The number of bottles needed is governed by the tray selected as a reservoir (see below).
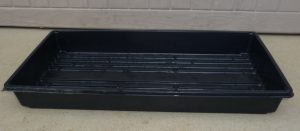
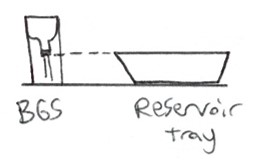
-1x Reservoir: This can be any plastic tray that fits in the space you have and has sufficiently tall sides. “Sufficiently tall” is governed by the bottles you’re using. When one bottle is made into a standard BGS unit, the sides of your reservoir will ideally come to the same height as the bottom of the bottle cap:
If the reservoir is deeper than this, there will be wasted vertical space in the reservoir. If the reservoir is shallower than this, the final UBGS will have less water capacity than it could. However, the final UBGS will still work either way.
The version shown uses a solid bottom nursery flat tray as a reservoir, but these can be hard to come by and are too large to fit into the Bottle Biology crate-based light boxes. Other containers will work fine as long as they approximately meet the standard for depth. If you identify a tray that is appropriately sized for the light box, please let us know and we can publicize it as a reservoir option.
-Soldering Iron or Awl: This is the most hazardous tool this project requires. Always take appropriate precautions (safety glasses, for instance) and be extra cautious if you are working with children.
If you choose a soldering iron, be prepared to get melted plastic residue on it. Older kids may be able to help with these steps but for younger children, make the holes beforehand and then have the kids help with the rest.
-Zip ties. Choose zip ties that fit snugly but comfortably through a hole made by your soldering iron/awl.
-Scissors
-Permanent marker
-Wick material. Many kinds of string work acceptably well. Braided nylon mason twine is recommended in that it is sturdy, relatively inexpensive, does not rot, and can be purchased at a range of hardware stores or online retailers. Avoid twisted mason twine which tends to come unraveled at the cut ends.
-Soil, Plants and Fertilizer. Depending on your purposes, the plants selected could be Wisconsin Fast Plants, appropriate cuttings, or others. See the standard BGS instructions and the instructions for Discovery Cup Gardens, both referenced above, for inspiration.
Construction Steps
1.Determine whether the UBGS is compatible with your experiment design/ curriculum (see Background section, page 2).
2.Select a tray to serve as the reservoir. Ensure that it meets the height standard (see above). Make only one bottle growing system for a test so as to avoid needless extra work later.
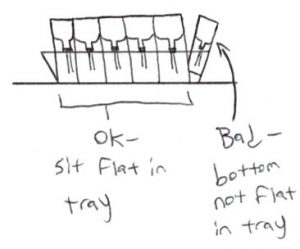
3.Gather your bottles. Arrange them in rows and columns in the reservoir tray such that the sides of the bottles touch.
You will use the maximum number of bottles that can stand upright in the bottom of your tray, or the number you need for grow space, whichever is less. This ensures that your eventual planters will stand upright:
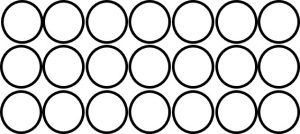
4.Record the number of bottles that fit in the tray and the row/column arrangement they fit in. In the UBGS illustrated in the photo on page 1, this is a 3×7 rectangle:
5.Take the number of bottles found in Step 4, and make all those bottles into standard BGS units. Do not add soil or water. (Consult the standard BGS instructions cited previously for help on this step.)
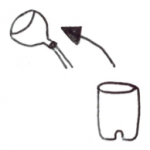
6.Remove the planter sections and wicks from the BGS units and set them aside.
7.Take one of the individual bottle reservoirs and remove the former bottom of the bottle, leaving a plastic cylinder:
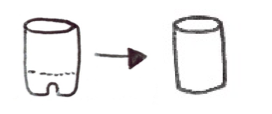
This can be difficult because the plastic at the bottom is sturdier. It is simplest to melt or poke a hole just above the bottom with your soldering iron or awl, and the cut around the bottom with scissors.
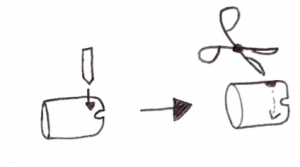
Don’t be too concerned about precision as the plastic is somewhat flexible and will accommodate the cylinder not sitting quite flat, etc.
8.Repeat Step 7 for all the individual bottle growing system reservoirs.
9.Place a planter section with wick in one of the plastic cylinders. Using the permanent marker, make 2 marks on the cylinder, one about ½ inch above the other but with both well below where the planter section will sit.
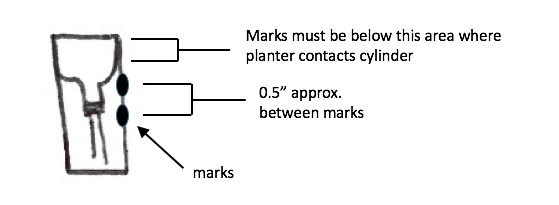
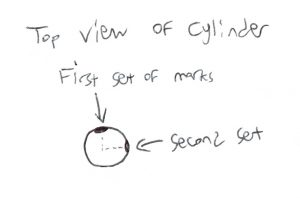
10.Rotate the cylinder and repeat Step 9. You should be left with a new pair of marks at about 90 degrees around the cylinder from the first set.
11.Remove the planter section from the cylinder. Use the soldering iron or awl to make holes at all four of these marked points.
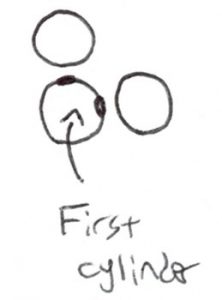
12.Line up two more of the cylinders next to the first.
13.Using the original cylinder with holes as a guide, make marks on the adjacent cylinders with the permanent marker:
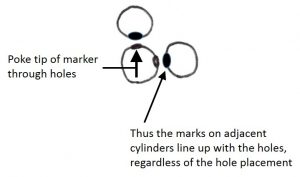
14.Poke holes in these newly marked cylinders with your soldering iron/awl.
15.Using zip ties, bind the cylinders together.
Thread each zip tie through one hole, into the adjacent bottle, and back to the first bottle:
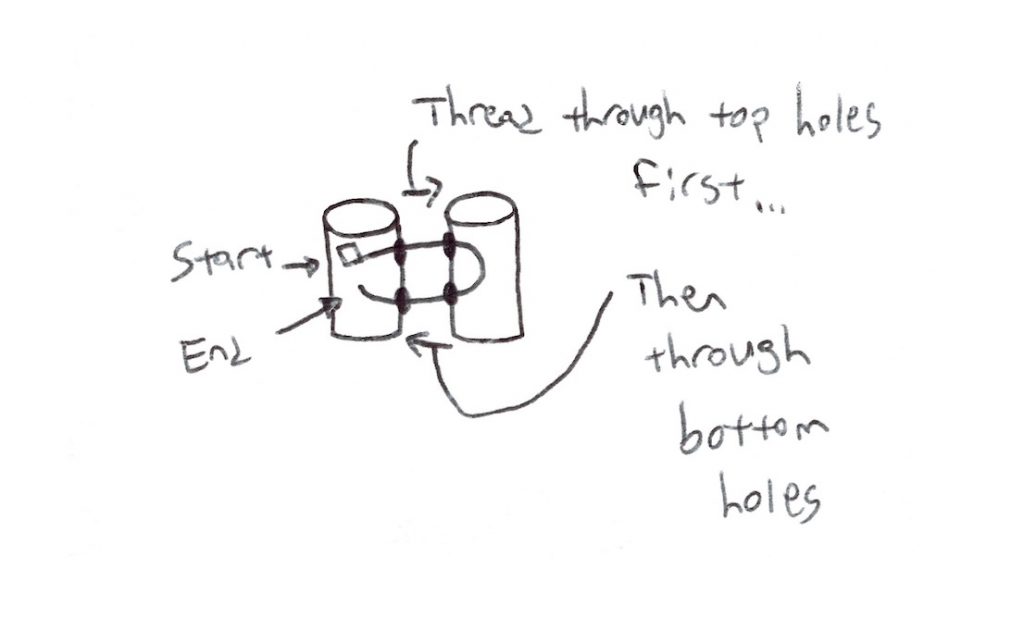
When this step is completed you should have three cylinders zip-tied together in a triangle or right-angle arrangement, shown from above in Step 13.
16.Continue to work with the cluster of three cylinders. Measure, mark, poke new holes, and zip-tie new cylinders onto that cluster, repeating the process of Steps 9 through 15 as needed until your full array of cylinders is produced and zip-tied together.
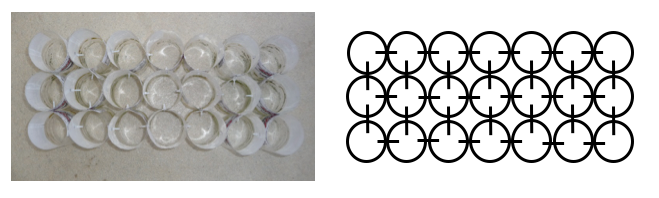
Both of these pictures are top-down views of the 3×7 array I made for my UBGS. The photograph on the left shows the actual array constructed. In the digital diagram on the right, each circle is a cylinder. The hash marks bridging the circles represent places where there are zip ties.
As with the bottom cutting, do not be too concerned about precision with the zip-tying. The plastic cylinders retain a great deal of strength in the vertical dimension, yet once they are bound into an array the whole unit flexes to accommodate imprecise construction.
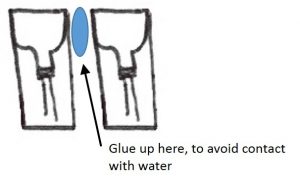 Alternative methodology: The cylinders could likely be glued into this array instead, using quick-drying glue or hot glue. This author has not yet tried glue, and it is likely to be somewhat less sturdy than the zip tie method, particularly in high-UV applications like exposure to direct sunlight. That said, it also would be much faster to build, and is likely sturdy enough for many applications. Glue joints, unlike the zip tie connections, should likely be made at the height of the planters instead of below, as many glues are water-sensitive over time:
17.Place the cylinder array in the reservoir tray.
18.Add soil, fertilizer and plants/seeds to your planter sections one at a time, making sure to water from the top to start the wicking action (see standard bottle growing system instructions).
19.Place each planter section in the array until the entire array is filled with plants.
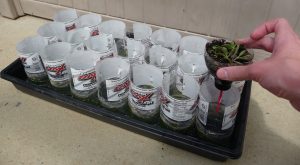
20.Move your Universal Reservoir Bottle Growing System to its final location before filling the reservoir as it is heavy once the reservoir is filled.
21.Fill the reservoir tray with water. The planters should not shift around much during this process if the array is well-constructed.
So long as the reservoir is kept filled, the plants in the UBGS should all receive water. (Important: If the reservoir runs dry, the wicking action must be restarted, which requires individually watering each planter to ensure its wick is wet.)
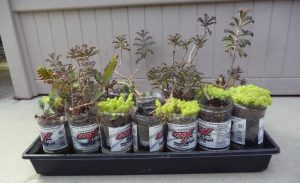
The individualized bottle growing system planters allow for the removal of particular plantings for experiments, pruning, disease control, etc. without disturbing the rest of the array:

You’re done! Place your UBGS in a sunny place and enjoy it.
About the Author
 Joel Cryer recently completed a bachelor’s degree in Biological Systems Engineering at UW-Madison. Through BSE, he combines his interests in engineering and plants in hopes of making agriculture more sustainable, perennial, and diverse.
Joel has been building things out of found objects, discards, and other “trash” since he was young. In college that interest was revived and redirected when Dr. Paul Williams visited the GreenHouse Learning Community in Leopold Hall, where Joel lived. Dr. Paul ran a Bottle Biology workshop and engaged GreenHouse residents in hand-on learning with plant propagation and construction of Bottle Growing Systems.
Joel and several fellow residents took that to heart and formed a Bottle Biology Club. While some club members focused on outreach, sharing Bottle Biology projects with children at public events, Joel focused on the physical construction of the growing systems, jokingly saying he was “in Bottle Bio research and development.” These instructions are one result of Joel’s ongoing tinkering.